In PEGA, there are 2
ways we can allow an operator to access an object.
· Role-based access
control (RBAC)
· Attribute-based
access control (ABAC)
In
this article, we will discuss about ABAC with an example. (Note : ABAC was
introduced in PEGA 7.2.2).
Scenario
:
Each
candidate case includes a Tax Identification Number (TIN) to identify the
candidate. This information is considered sensitive personal information. The
Human Resources (HR) department is required to prevent unauthorized access
to sensitive personal information. To satisfy this requirement, the HR department wants to mask the TIN unless the user is a member of either the HR
or Recruiting organization units. However, the field must be editable on the
first step of the case life cycle so that users can enter their TIN on the
form.
Below
are the steps in which we can achieve this.
· Enable
attribute-based access control
· Create the Operator
Security Attributes data type
· Create access
control policy condition record
· Create access
control policy record
Enable attribute-based access control :
In
Designer Studio, open the Records Explorer. In the Records Explorer,
click SysAdmin > Dynamic System Settings to
list all the Dynamic System Settings records on your system.

Open
the EnableAttributeBasedSecurity dynamic
system setting. In the Value field,
enter true. Save the dynamic system setting
record to enable attribute-based access control.

Create the Operator Security Attributes data type :
In
Designer Studio, open the Data Explorer. In the Data Explorer, click the
Explorer menu and select “Add data type” to
open the Add Data Type dialog.

In the Label field, enter Operator
Security Attributes.

Click Submit to create the Operator Security Attributes data type. The data type form opens, displaying the Data model tab.
On
the Data model tab, click Add field. A row of empty fields is displayed. In
the Name field, enter “Org unit”. Click out of the Name field to add the
OrgUnit property to the data type.

In the Data Explorer, right-click Operator Security Attributes and select Add data page to open the Create Data Page form.

On
the Create Data Page form, in the Label field, enter “Operator security
attributes”.

Click
Create and open to open the D_OperatorSecurityAttributes data page record.
On the data page record, from the Scope drop-down list, select “Requestor” to configure the data page as a requestor-level clipboard page.
Under Data sources, in the System name field, enter “Operator attributes data page”.
On the data page record, from the Scope drop-down list, select “Requestor” to configure the data page as a requestor-level clipboard page.
Under Data sources, in the System name field, enter “Operator attributes data page”.
From the Source drop-down list, select Data Transform.
In the Data transform name field, enter SetOperatorSecurityAttributes.
In the Data transform name field, enter SetOperatorSecurityAttributes.

Click the Crosshair icon to open the Create Data Transform form.

Click
Create and Open to create the “SetOperatorSecurityAttributes” data transform.
On the SetOperatorSecurityAttributes record, in the Target field, select .OrgUnit.
In the Source field, enter “OperatorID.pyOrgUnit” to copy the value of the pyOrgUnit property from the OperatorID page to the data page.
On the SetOperatorSecurityAttributes record, in the Target field, select .OrgUnit.
In the Source field, enter “OperatorID.pyOrgUnit” to copy the value of the pyOrgUnit property from the OperatorID page to the data page.

Click Save to complete the configuration of the data transform.
Return to the data page record and click Save to complete the configuration of the data page.
Create the access control policy condition record:
From
the +Create menu, select Security > Access Control Policy Condition to open
the Create Access Control Policy Condition form.

On
the Create Access Control Policy Condition form, in the Label field, enter “HR
or Recruiting”.
In the Apply to field, enter a class where “Tax Identification Number” property is present. This is to create policy condition rule in the same class as property.
In the Apply to field, enter a class where “Tax Identification Number” property is present. This is to create policy condition rule in the same class as property.

Click
Create and open to open the Access Control Policy Condition record.
In the Conditional Logic section, click Add conditional logic to create a test condition.
In the WHEN field, enter IsHROrRecruiting and click the Crosshair icon to create an Access When record.
In the Conditional Logic section, click Add conditional logic to create a test condition.
In the WHEN field, enter IsHROrRecruiting and click the Crosshair icon to create an Access When record.

On the Create Access When form, click Create and open to create the Access When record.
Enter the below conditions.
D_OperatorSecurityAttributes.OrgUnit= “HR”.
D_OperatorSecurityAttributes.OrgUnit= “Recruiting”.

Click Save to complete the configuration of the Access When record.
Return to the HROrRecruiting access control policy condition record. In the Policy Conditions section, in the Column source field, enter or select .pxCreateOperator.
From the Relationship drop-down list, select Is not null.
Click
Add condition to create a second policy condition.
In the empty policy condition row, in the Column source field, enter or select .pxCreateOperator.
From the Relationship drop-down list, select Is null.
In the empty policy condition row, in the Column source field, enter or select .pxCreateOperator.
From the Relationship drop-down list, select Is null.
In
the Conditional Logic section, under WHEN, in the Permit access if field, enter
A to apply the first policy condition if the Access When record returns a
result of true.
Under
OTHERWISE, in the Permit access if field, enter B to apply the second policy
condition if the Access When record returns a result of false.

Click Save to complete the configuration of the access control policy condition.
Create the access control policy record :
From
the +Create menu, select Security > Access Control Policy to open the Create
Access Control Policy form.
On the Create Access Control Policy form, in the Label field, enter “Restrict TIN”.
From the Action drop-down list, select “PropertyRead” to apply the policy condition when reading a property value.
In the Apply to field, enter class to create the policy in the same class as the Tax Identification Number property .pyTIN.
Click Create and open to open the Access Control Policy record.

On
the Access Control Policy record, in the Permit access if field, enter or select
“HROrRecruiting” to apply the HR or Recruiting access control policy condition.
Click Add Property.
In the Property field, enter or select .pyTIN to apply the policy to the TIN field.From the Restriction Method drop-down list, select Mask all but last ‘N’ to apply a mask to all but the last four digits of the TIN.
Click Add Property.
In the Property field, enter or select .pyTIN to apply the policy to the TIN field.From the Restriction Method drop-down list, select Mask all but last ‘N’ to apply a mask to all but the last four digits of the TIN.
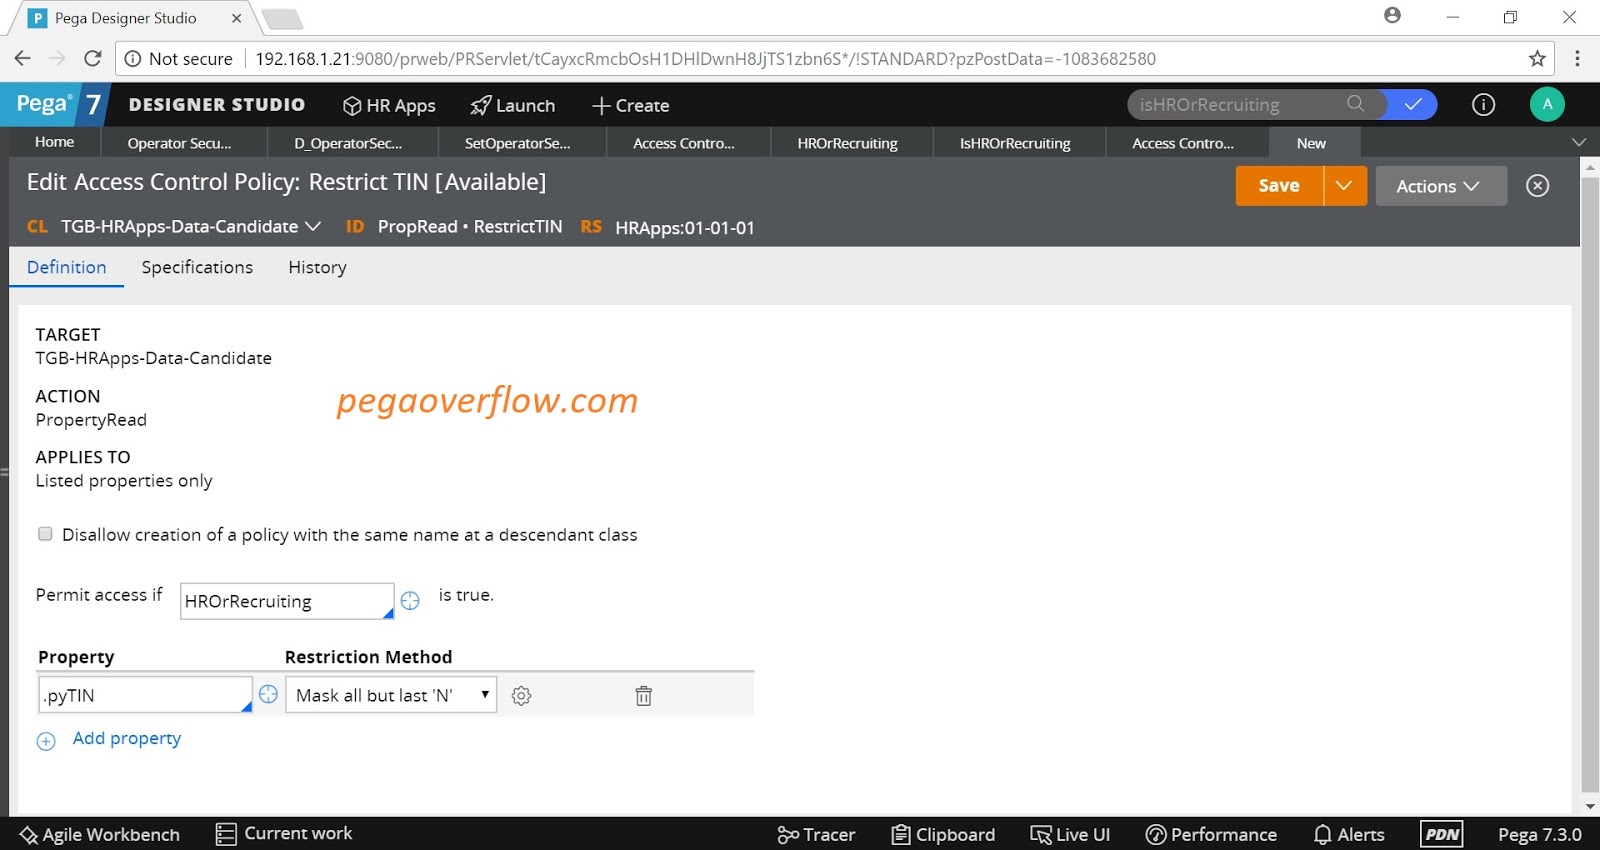
Click
the Gear icon to open the Masking and Formatting Options dialog.
In the Masking and Formatting Options dialog, confirm that the following options are set.
In the Masking and Formatting Options dialog, confirm that the following options are set.
Masking
character : *
Number
of unmasked characters : 4

Click
Submit to close the Masking and Formatting Options dialog and return to the
access control policy record. Click Save to complete the configuration of the
access control policy.
Testing :
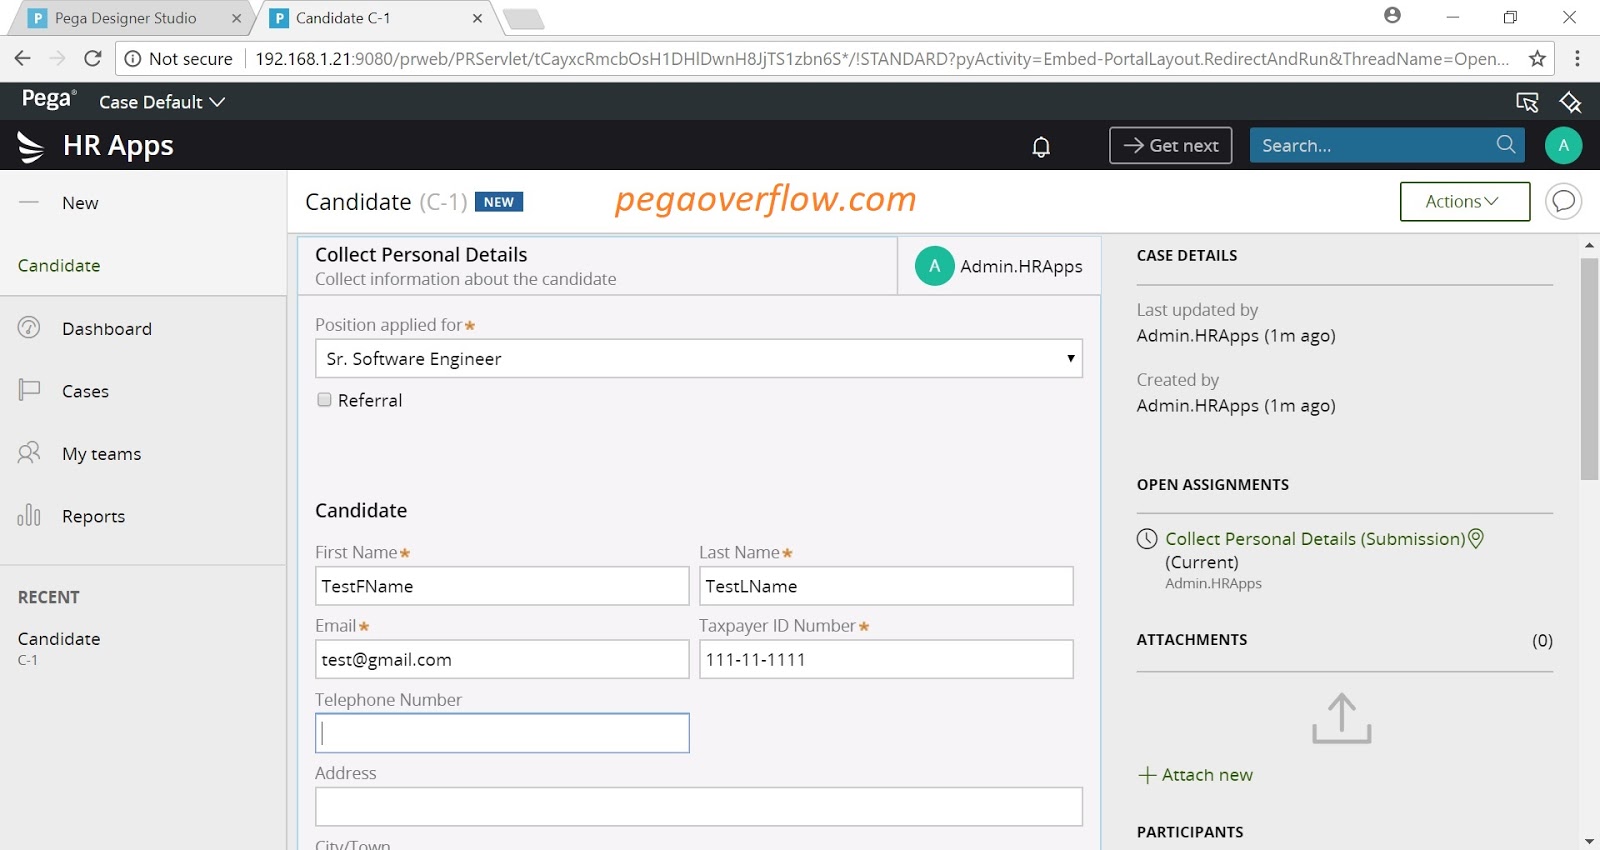
Create
a new Candidate case. On the Collect Personal Information form, in the
Taxpayer ID Number field, enter 111-11-1111 (As per given scenario, thi field
must be editable on the first step of the case life cycle so that users can
enter their TIN on the form, so this is achieved).
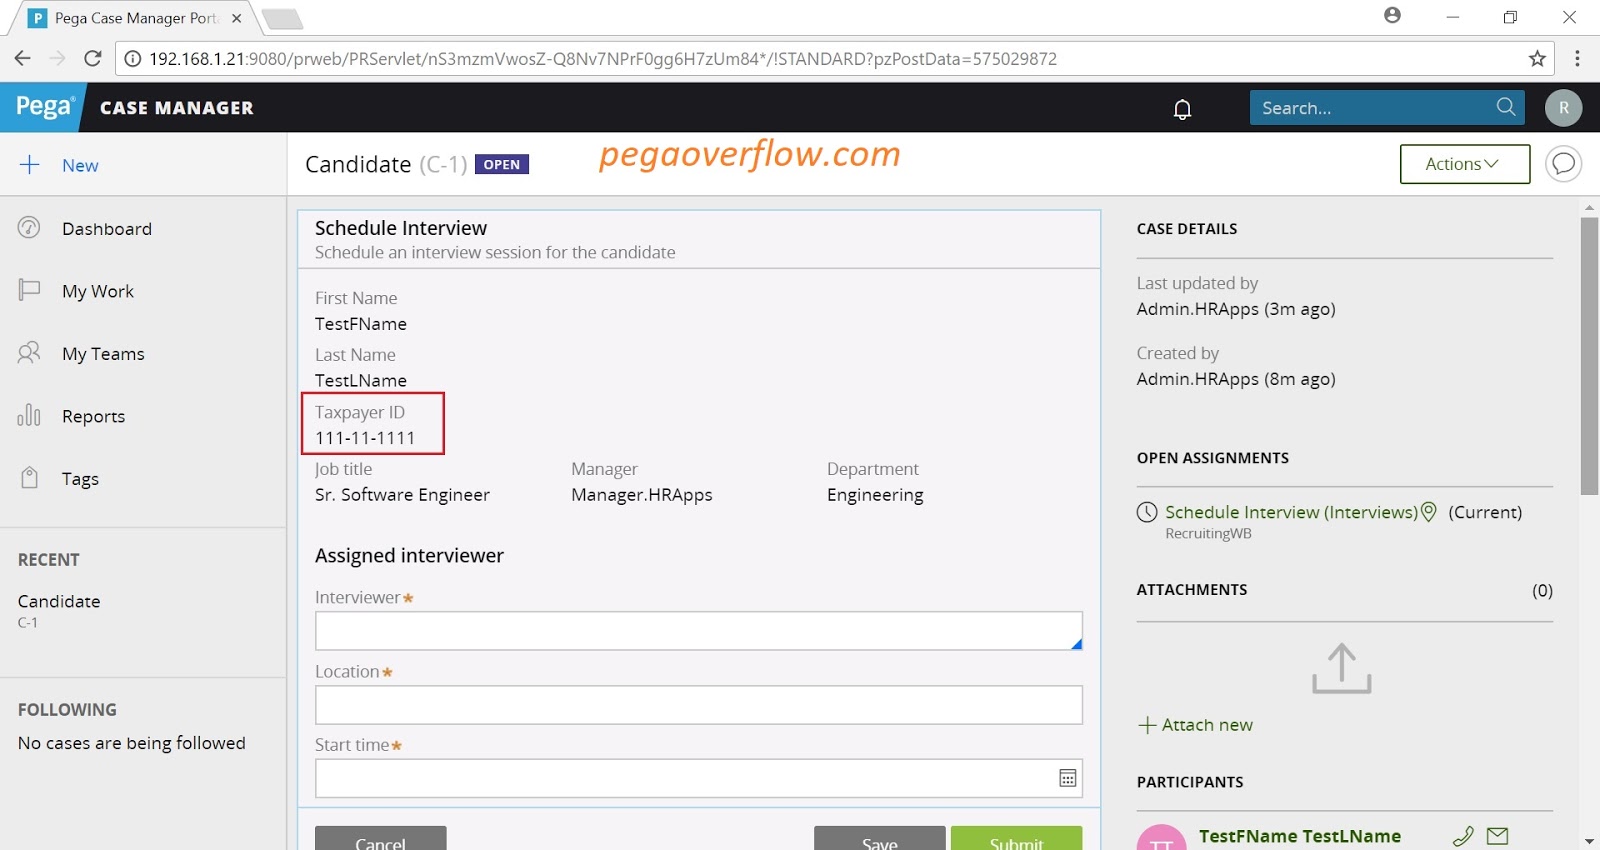
Navigate
to the schedule interview screen. Confirm that the Taxpayer IDfield displays
*1111. (This field should be masked unless he is a HR or recruiter)

Now
log in as the user Recruiter.

Open
the case we just created and confirm that the Taxpayer ID field displays the
full number, 111-11-1111, with no mask.
Excellent article! Very well written. The screenshots are placed wherever they are needed. The explanations are to the point and crystal clear.
ReplyDeleteAwesome compilation of topic. Thanks for the explanation.
ReplyDeletegood one
ReplyDelete